Recycled polypropylene, aluminum rings. DC motor, monofilament
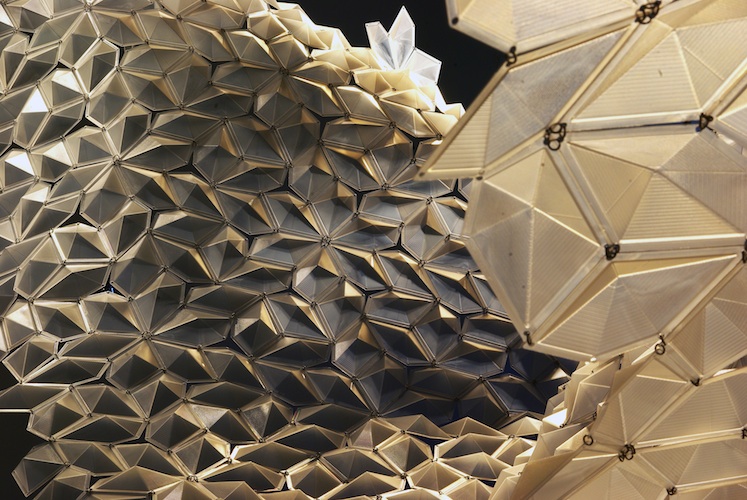
Polyscape is a “floating island” made of recycled polypropylene plastic, which is the material used to make disposable bags and drinking bottles. The suspended, kinetic piece mimics the motion of water and undulates when it detects human motion. It comments on the Great Pacific Garbage Patch, a.k.a. the Pacific Trash Vortex, which is a floating island of ocean debris made of plastic, estimated to be 100 million tons and twice the size of Texas.
Polyscape: This art piece shows how geometric modeling using computer-aided design supports construction of a complex shape from simpler polygons. This kinetic sculpture is composed of polypropylene pentagons joined with rings at the corners that allow the pentagonal tiles to move. This structure exhibits the possibility of motion within a certain limited range that is actualized when a sensor sends signals to a processor that starts a mechanical motor connected to some of the tiles.
Yulia Pinkusevich
Yulia Pinkusevich is an interdisciplinary visual artist. Born in Kharkov, Ukraine (former USSR) she holds a Bachelors of Fine Arts from Rutgers University and a Masters of Fine Arts from Stanford University. Yulia has been awarded residency grants from Cite International Studio in Paris, Headlands Center for the Arts, Redux Art Center, Goldwell Open Air Museum and The Wurlitzer Foundation.
Skills Applied
 MANUFACTURING PROCESSESS
 CAD (COMPUTER AIDED DESIGN)
 ELECTRONIC CIRCUITRY
 ARDUINO PROGRAMMING
ARTIST SUGGESTION
POLYSCAPE is a “floating island” that is made out of recycled polypropylene plastic, the same material used in making many plastic products such as disposable bottles and bags. The overall form of the installation is pentagonal tessellation or a pattern of interlocking shapes. The basic shape was designed in CAD then CNC milled into an aluminum mold which was then placed into a machine and injected with molten polypropylene pellets. This massive machine is called the Injection Molder. The injection molding process efficiently creates multiples using the same manufacturing process applied in industry. Once the pentagonal shapes are molded and cleaned up each piece is then assembled together. This is done by hand, linking each piece with aluminum rings using needle nose pliers. This is a painstakingly long and repetitive process and can be compared to knitting or crocheting. The end result creates a blanket like tessellated polymer fabric. This assembled poly-fabric is then suspended from the ceiling with monofilament or heavy duty fishing line. Certain monofilament lines attach to a motor which upon activation moves the fabric such that it undulates mimicking the motion of water. The motor is activated by an infrared sensor which feels the presence of people, thus POLYSCAPE undulates only if humans are present. When I am developing a concept I search the web for inspiration and collect many reference images. I search for artist working in similar mediums or with similar ideas, I also look at architectural structures, mathematical patterns, ancient mosaics, various tessellations, etc.
Stemarts Design Tool
Explore the site to come up with your idea. Pick an artist or topic.
This artist is one of 20 ISEA2012 artists featured in this curriculum. Explore them all to see which you would like to use as a model for your project. It could be a combination of different artists and topics that inspire the work. Print out the STEMArts Design Tool which outlines these steps and use it as a guideline in your process. Visit the Wiki-Resource on each artist page to see tutorials, activity ideas, read articles about the medium that the artists explored and other resources to help you find something that peaks your interest. Click on the Artist Interview button on each page to read a personal interview with each artist. The artist was asked questions to share their creative process, talk about the medium they work with, and to share tips and advice for you as you begin your design process. In this phase, you are looking for inspiration for an project that is meaningful to you. Get a journal and start sketching and writing notes on your process.
Brainstorm and come up with ideas for your art piece.
In this phase, you will need to sketch, doodle, contemplate, or journal, in order to start allowing ideas to formulate. Search the Wiki-Resource under keyword “brainstorming” to explore some techniques and articles. The artists in the Artists Interviews also share their personal brainstorming techniques. Read through all these resources and do some research yourself. Then set aside some daydreaming time and get started. Think big and let all the ideas you have hit the page without editing them. Get in the flow and write or draw in a journal any ideas you come up with that you would like to explore further.
How are you going to turn the idea into a reality? Research.
Brainstorming and researching go hand in hand. You will be going back and forth between the two until you come up with a plan. Once you brainstorm some great ideas for an art piece you will need to research to learn more about the topic or medium. In turn, that leads to more brainstorming. How are you going to turn the idea into a reality? What materials do you need? Can you build it yourself or will you need help? In your journal make a list of any questions or concerns that come to mind. Search the Wiki-Resource under the keyword “research tips” for ideas, and explore on your own to find the answers to your questions. If you need to collaborate on this piece, decide who that will be and make plans to work together.
Start your design plan.
You have everything you need now to start creating. Refer to your journal to review your process up until now. Review the STEMArts Design Tool. Research online if you still have a question about anything. Ask your teacher for help. Now, it´s time to make a materials list and sketch out your plan of action. Or perhaps you prefer to dig in and start building something? There are many ways to approach it and every artists has their own style. Each artist shared their own design approach in the interviews. Look back over them and see which approach suits your style. Start creating!
See how it works, test and re-test until you get what you want.
The design process always involves testing out your ideas in the real world, and building prototypes to see if it works. You also may find that once you start building it, it is not what you had in mind. This is part of the process. It helps to document everything you do in your journal. This is the hardest stage because it is easy to get discouraged. Read about what the ISEA2012 artists say about this phase. Ask for help when you need it. If you get stuck, go back to the brainstorming phase for new ideas. Get feedback from your teacher, your friends, and experts. We created a Troubleshooting Guide to help you evaluate and critique your work in case you are stuck on your design.
Practice presenting in order to get feedback for your finished piece.
You have probably explored options for presenting your work but this is the time to work out the details. Your venue will often determine the presentation format. Now is a good time to present your work to friends and peers to get some feedback. Our Feedback Survey poses questions that will help you critique your own work, and provides tips on receiving constructive feedback from others. It will also help to look back on your design process to see if you are where you want to be with your art piece.
Bringing it all together. Time to share it.
Sharing your work can be scary and thrilling at the same time. Hear what artists have to say about the importance of sharing their work with the public. Do you want to share it in your community? Is there a venue interested in what you have created? Will you use Vimeo, YouTube, a blog? Search under keyword “Share tools” in the Wiki-Resource for some links and ideas.
STEMarts Wiki
Search this open source wiki for links to learn more about the type of art, medium and STEM topics explored in the “Polyscape” project. We suggest starting with building your own geodesic dome or the geometric design activities in Geometric Design in Islamic Art, which will help you explore some of technical aspects of the “Polyscape” project. You will also find links to articles, images, video, tutorials and more to provide a starting point for your research in creating an art piece or project inspired by the Polyscape project. If you have find anything interesting on your own please consider sharing it in this open forum.
Remember the resource is an open forum sharing links and ideas that others have found – always check your sources and give credit where credit is due. The open source movement generously shares its knowledge and relies on users and sharers feedback – so if there’s something really good or doesn’t work let others know.
3D 3D modelling 3D Printing CAd Casting Chaos Theory Design Drawing Dynamic systems Fractals Geodesic Dome Geometry Islamic Art Kinetic Sculpture Mathematics Mould Making Open Source Software OS Pattern Peer2Peer Production Perspective Programming Rapid Prototyping Recycling RepRap Sculpture Synthetic biology VIEW ALL Waves
MODELING WITH GEOMETRY

Apply geometric concepts in modeling situations
G-MG.1. Use geometric shapes, their measures, and their properties to describe objects (e.g., modeling a tree trunk or a human torso as a cylinder).
G-MG.2. Apply concepts of density based on area and volume in modeling situations (e.g., persons per square mile, BTUs per cubic foot).
G-MG.3. Apply geometric methods to solve design problems (e.g., designing an object or structure to satisfy physical constraints or minimize cost; working with typographic grid systems based on ratios).

